MISSION, KS--(Marketwired - Apr 6, 2015) - (Family Features) From road trips to grandma's house to once-in-a-lifetime treks across the globe, nothing rejuvenates the spirit quite like travel. Now vacation memories can be shared for years to come with simple, do-it-yourself projects.
Some of your best memories are made while traveling, so honor them with keepsake crafts that you can make uniquely yours. Travel keepsake decor is a great way to capture and preserve all of the wonderful places you've visited, as well as creating a great conversation piece for all who visit your home. Whether it's a postcard or a sea shell, make use of knickknacks you've picked up on your journeys and incorporate them into a piece of art you and your family can cherish.
Whether you want to build anticipation for the little ones for an upcoming trip or just want a cute reminder of things to stow away in the suitcase, these engaging projects, created by the crafting experts at Jo-Ann Fabric and Craft stores, will have you longing for your next great adventure.
For these and other clever crafting ideas, visit www.joann.com.
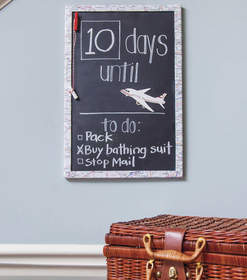
Travel Countdown Board
Crafting time: 1-2 hours
Skill level: No experience necessary
Supplies and Tools:
Decoupage
Travel paper
Framed chalkboard
Paint markers
Paintbrushes
Ruler
Twine
Chalk
Clothespin of choice
Scrapbook travel embellishments
Double-sided adhesive
1. Decoupage travel paper to frame of chalkboard and allow to dry.
2. Draw countdown calendar spaces and words using paint markers, paintbrushes and ruler. Allow to dry.
3. Tie twine around chalk and then through clothespin.
4. Use adhesive to attach clothespin to board in place desired.
5. Add travel embellishments as desired.
6. Use chalk to fill in blanks.
Vacation Memory Block
Crafting time: 1-2 hours
Skill level: Some experience necessary
Supplies and Tools:
Wood block: 3 1/4-by-3 1/4-by-3 1/4-inches
Paint
Paintbrush
DCWV 12-by-12-inch Travel Adventure Cardstock Stack
Paper punch: corner rounder
Ink
Photos
Scissors or paper trimmer
Papercrafting adhesive
Pencil
Ruler
Twine
1. Paint wood block desired color. Set aside to dry.
2. Cut six 3 1/8-inch squares from the different prints in the Travel Adventure Stack. Round corners of each square with paper punch and ink around all four sides. Adhere square to each side of wood block.
3. Adhere travel photos to block.
4. Cut sentiments and embellishment shapes from Travel Adventure Stack. Adhere in place. Add visual interest to block by bending some embellishments from one side to another, adhering in place.
5. Tie twine around block.
About Family Features Editorial Syndicate
This and other food and lifestyle content can be found at http://www.editors.familyfeatures.com. Family Features is a leading provider of free food and lifestyle content for use in print and online publications. Register with no obligation to access a variety of formatted and unformatted features, accompanying photos, and automatically updating Web content solutions.
Contact Information:
Vickie Rocco
vrocco@familyfeatures.com
1-888-824-3337
http://editors.familyfeatures.com